· Matthew Watt · Series · 16 min read
Fable Reminders - Part 2
Build a reminders app completely in F#. In part 2, we model our domain using F#'s algebraic data types, bootstrap our application using Elmish, and take a deeper look at some functional programming concepts along the way.

Overview
In part 1, we laid the groundwork for the F# goodness to come by:
- Creating a JavaScript project with Vite
- Creating a .NET solution + project and configuring it with its dependencies (Feliz and Elmish.React)
- Configuring vite-plugin-fable so that we can compile our F# and have it run in the browser as JavaScript.
By the end, we had a console log greeting from F#! How exciting! Well…not really. In fact, it’s pretty boring and uninspired. Let’s work toward changing that.
The plan
In part 2, we will:
- Learn about F#‘s powerful system of types and type inference and how it helps us model application domains with ease
- Break our domain into two main components - the side bar and the selected list - and model them using F# types
- We’ll explore the main components of an Elmish application and wire them up for our application
- Finally, to get the satisfaction of seeing visual progress, we’ll also scaffold out a basic UI layout
Let’s get started!
Modeling our domain with F# types
There’s a lot that makes F# a great language to use for building everyday software. For one thing, it is a first-class member of the .NET family, which means we immediately have access to the vast catalog of existing open source libraries and frameworks that developers have been using to write great software for decades.
If that weren’t enough, F# adds to that ecosystem by providing a powerful type system that allows for expressing ideas, abstractions, and entire domains in ways that would be difficult, if not impossible, to express in its cousin languages, C# and Visual Basic. What makes this type system so powerful? In my experience, its power lies in its simplicity and its ability to guide you to a correct implementation, such that if your code compiles, it is much more likely that it works as intended. Let’s start modeling our application’s domain to get an idea for what this looks like.
The Reminder type
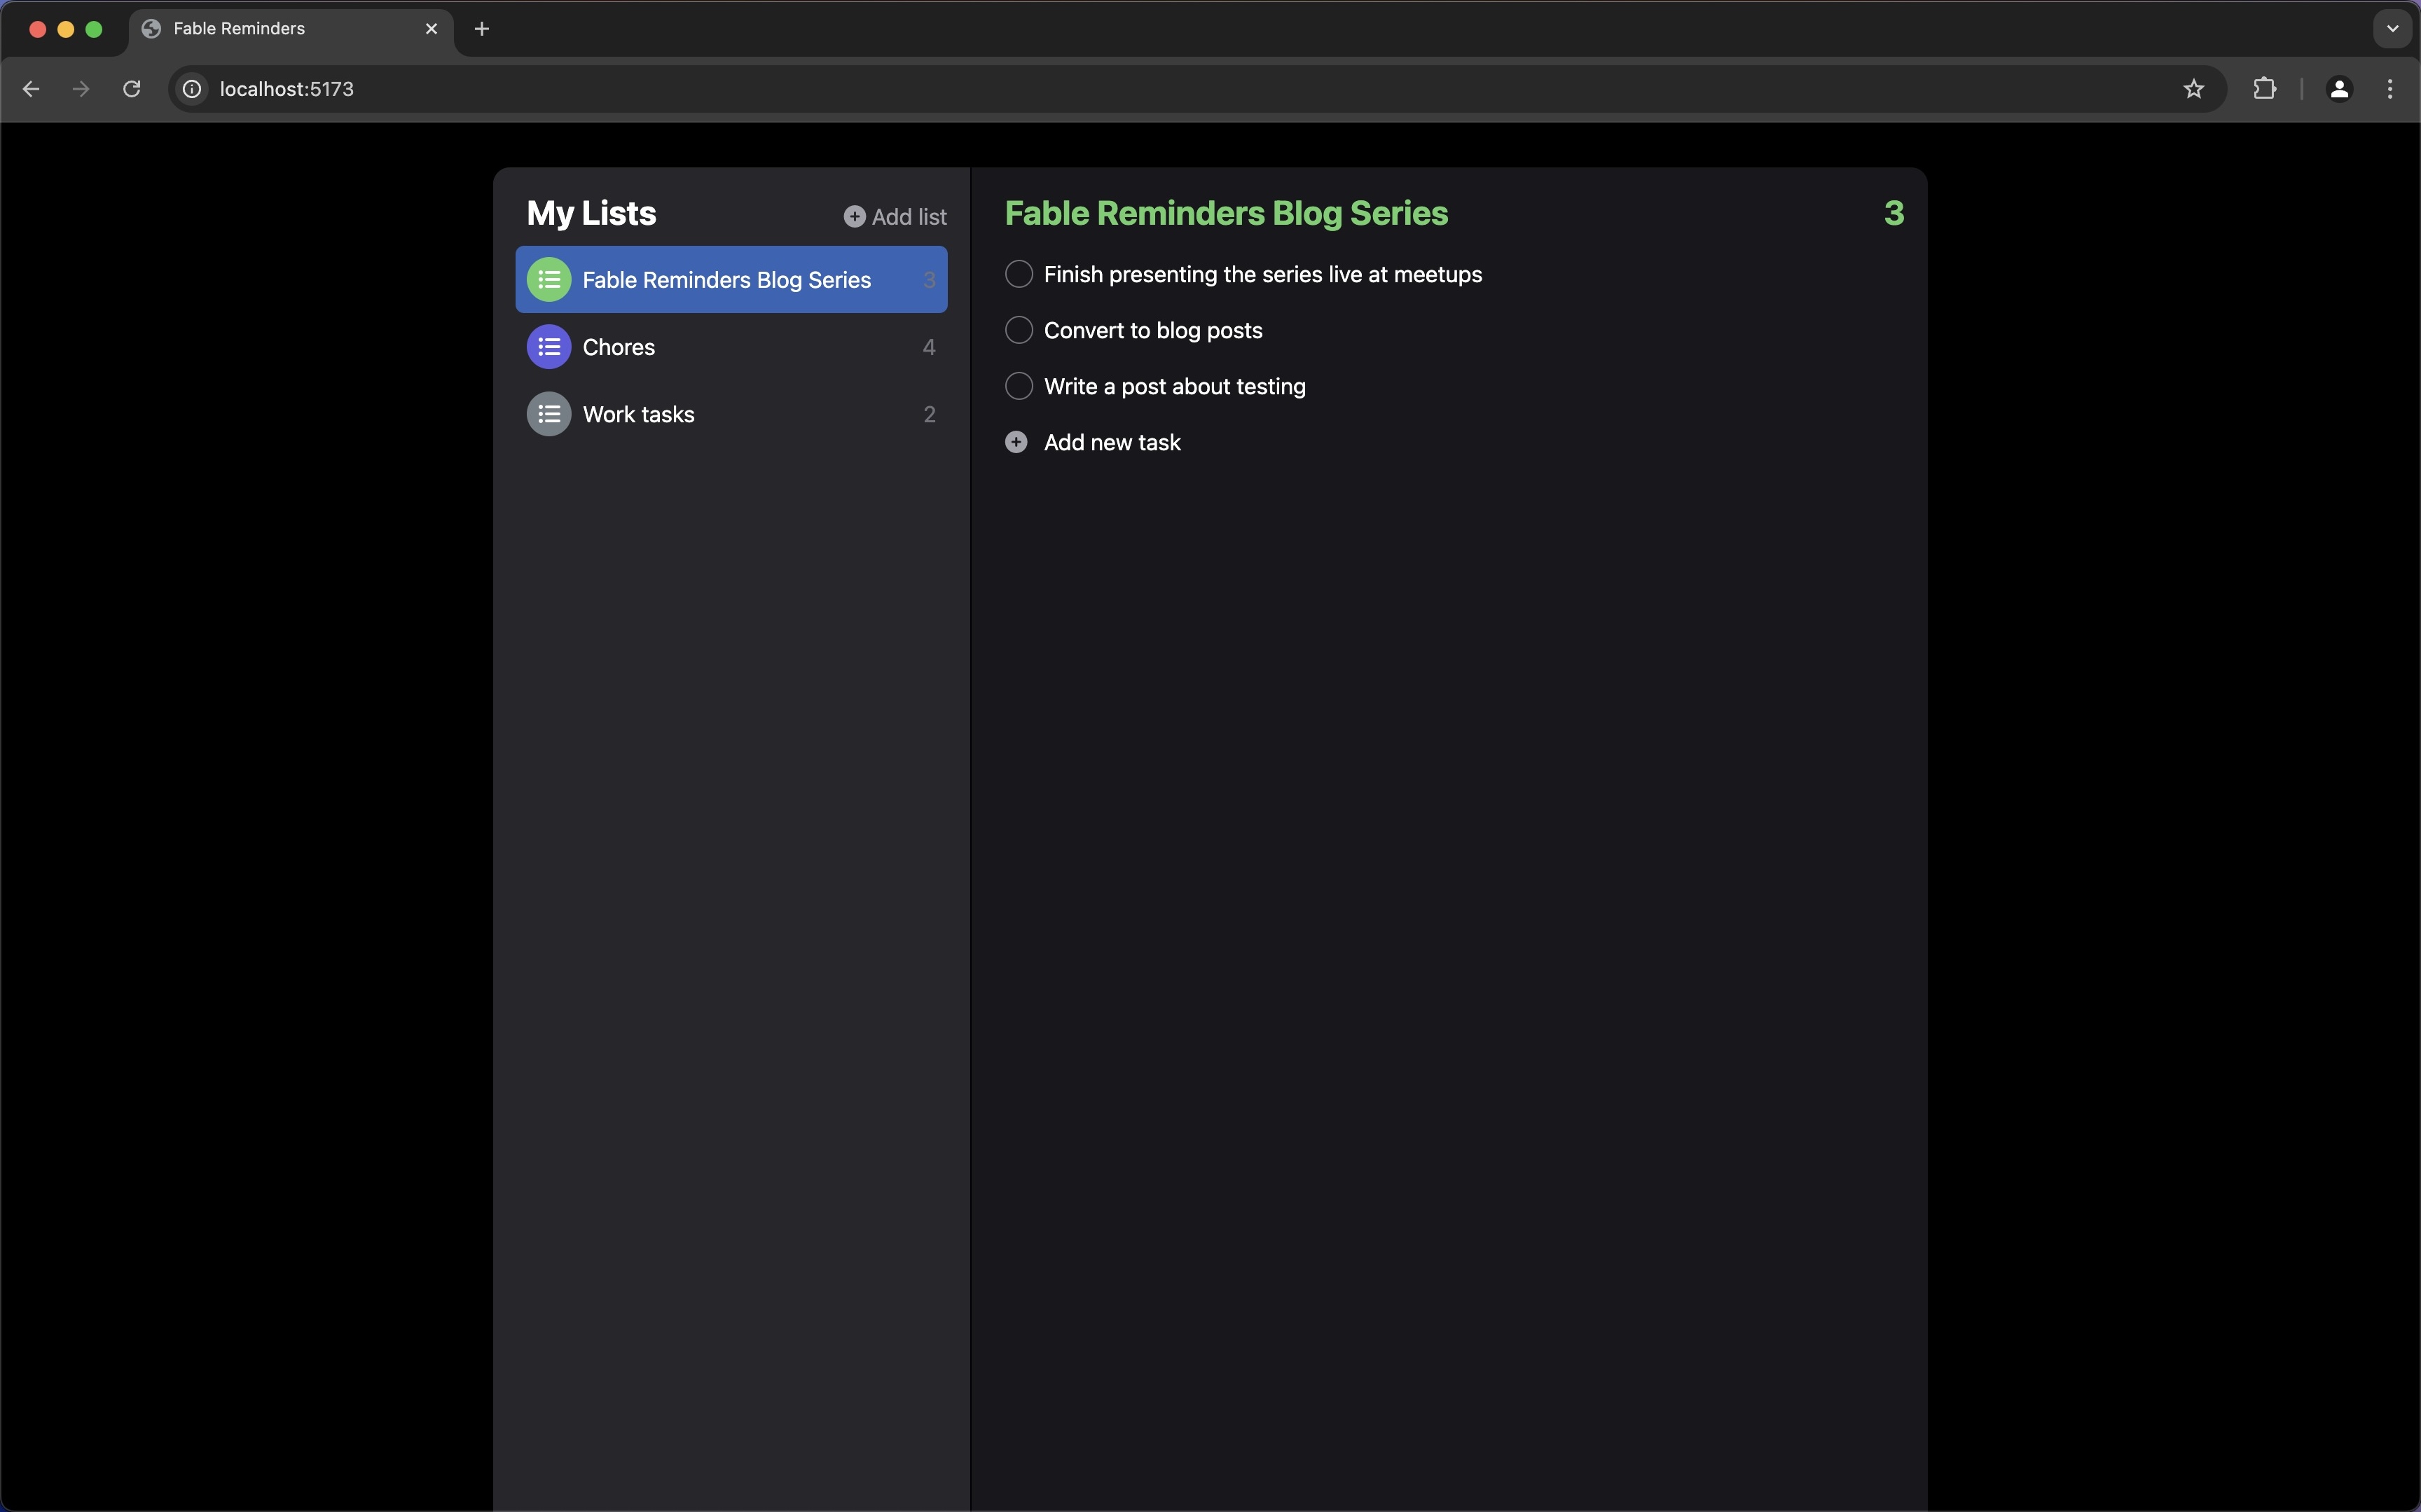
As a reminder (heh), here’s our ultimate goal:
The first thing our reminders app needs is a data model for a single reminder. In other languages, you might reach for a class or an object to do this. In F#, we’re going to use a record. Let’s learn about records by defining one. First, we’ll need a source file where our application’s code will live. Let’s create a file right next to Program.fs and call it App.fs. In App.fs, add the following:
[<RequireQualifiedAccess>]
module App

type Reminder =
  { Id : int
    Task : string
    IsCompleted : bool }
Let’s break this down:
First, we define a module. Per the F# language reference, a module is “a grouping of F# code, such as values, types, and function values, in an F# program. Grouping code in modules helps keep related code together and helps avoid name conflicts in your program.” To start, all of our application code will live in a single module, the App module. In the future, we will see what it looks like to break up an application into multiple modules.
We are also using F#‘s attribute syntax to mark this module [<RequireQualifiedAccess>]. This means that all of the types, values, and functions defined within the module must be accessed via the module name. So if we want to access our Reminder type from outside the App module, we have to type App.Reminder. The reason for doing this will be clear later.
Next, we define our record. To define a record, we start with the type keyword, followed by the name of our type and an "=". Next, between a set of curly braces - one of the few times we will actually use curly braces in F#, I might add - we define the properties of our record. Each property is defined by providing a name, followed by a ":", and then the type of the property. The type of the property can be any other F# type, such as primitive types like int or bool. It could also be another record or other user-defined type. In our case, a reminder in our application’s domain needs a unique identifier, a description of the task to be completed, and a value to tell us whether the task has been completed or not.
Functional sidebar: strongly typed identifiers
For our unique identifier, we’ve chosen to use int. Normally, int wouldn’t be a great unique identifier. I’ll demonstrate this with an example. Imagine we have the following records:
type Reminder =
  { Id : int
    Task : string
    IsCompleted : bool }

type Person =
  { Id : int
    FirstName : string
    LastName : string }
Now let’s say I want to write a function that will retrieve a Person from a database. We could write that function like this:
let getPersonById (id : int) : Person =
  // ... imagine some code here to fetch a person from the database
This function takes an int id as a parameter and returns a Person. Now, there are some problems with this function other than the fact that we haven’t actually implemented it. For simplicity, I am glossing over them. For now, we could call that function like this:
let personId = 1
let person = getPersonById personId
This is all well and good. But what about the following?
let reminder =
  { Id = 1
    Task = "Write more F#"
    IsCompleted = true }

let person = getPersonById reminder.Id
There are a few things I want you to notice about this example.
First, this is the first time we’re creating a value of a record type. The syntax is very similar to defining a record type. The difference is that instead of ":", we use "=", and instead of providing name-type pairs, we provide name-value pairs:
// Definition
type Reminder =
  { Id : int
    Task : string
    IsCompleted : bool }

// Create value
let reminder =
  { Id = 1
    Task = "Write more F#"
    IsCompleted = true }
Second, we’ve tried to lookup a person using a reminder id…and the compiler was perfectly happy to let us do so because the types all checked out. This is a logic error. The reason we like statically typed functional programming languages like F# is because we want the compiler to prevent us from making such mistakes in the first place!
The solution to this would be to define a brand new type to represent identifiers for the various entities in our domain, like Person and Reminder. Then, we could refactor our getPersonById function to use that type, like this:
let getPersonById (id : PersonId) : Person =
  // ... imagine some code here to fetch a person from the database
Now, we couldn’t pass in a ReminderId even if we wanted to, because the compiler would prevent us. Excellent!
All that being said, we will make some concessions for the sake of not overcomplicating things. For our Reminder, we are content to use int and simply be careful, being aware of the pitfalls we just mentioned. If we were to roll this application to production, however, we would want to revisit this and define dedicated identifier types.
Alright, sidebar over.
The ReminderList type
In our application, we’re not just going to have a single reminder. That wouldn’t be a very useful reminders app, now would it? Let’s create a type to model a list of reminders. In App.fs below the Reminder type, add the following:
type ReminderList =
  { Id : int
    Name : string
    Color : string
    Reminders : Reminder list }
Breaking it down:
A reminder list has a unique identifier, and we’ve chosen to make the same concession as with our
Remindertype and use a simpleintfor this purpose.A reminder list has a name, which is a
string.A reminder list has a color, which will be used to make the icons and some of the typography stand out in the user interface. Here, we model it as a
stringin which we will store a hex color value, such as"#EB5545".A reminder list has, well, a list of reminders. Here, we use F#‘s list type to store a list of
Reminderrecords.
Functional sidebar: making invalid states unrepresentable
One principle that we value in strongly typed functional programming is to make invalid states unrepresentable. This means that we leverage our type systems to model our domain in such a way that invalid states can’t even be constructed. Let’s take a look at our ReminderList type and some ways we might be able to apply this principle.
- We probably don’t want to allow an empty name
To make the empty string state unrepresentable here, we could create a new type, like NonEmptyString. Then, the only way to construct such a type is via a function, sometimes referred to as a “smart constructor”. This function then validates that the input string is not empty, returning an error if it is, or the NonEmptyString if not.
- A color needs to be a valid hex color string, such as
"#EB5545"
Just like our NonEmptyString, to make all non-hex color strings unrepresentable, we could create an explicit HexColor type with a smart constructor validating its inputs.
For simplicity, we won’t do this for this project, but I wanted to take the opportunity to explain the concept. Again, if we were pushing this to production, we would want to go back and do the “making invalid states unrepresentable” exercise in full.
Sidebar over.
Elmish
Now that we have modeled our specific domain — the domain of reminders and lists of reminders — as types, we need to model our entire application as types. For that, we have Elmish.
Let’s allow Elmish to introduce itself by reading its documentation:
Elmish implements core abstractions that can be used to build F# applications following the “model view update” style of architecture, as made famous by Elm.
It’s ok if you’ve never used Elm directly — the “model-view-update” (MVU) style of architecture has become popular outside of that ecosystem. If you’ve ever used a library like Redux for JavaScript or The Composable Architecture for Swift, you’ve used an MVU architecture. Even if you haven’t, the MVU pattern is not difficult to learn. So what exactly is MVU/Elm?
At a high level, every Elmish application consists of the following five pieces:
- State type - a type representing the data for your entire application.
- Message type - a type representing something that happened in your application, like “reminder created”. Messages are “dispatched” into the system, usually as the result of some UI interaction like a button click, but messages can come from external sources as well, like the result of a network call or database query.
- Initial state function - a function that returns the initial state of your application (shocking, right?)
- Update function: This function is called by the system whenever a message is dispatched. It takes the dispatched message and the current state of our application and returns a new state.
- Render function: This function is called by the system whenever the state changes. It takes the latest state and a dispatch function as input, and returns a representation of the view, which then gets rendered, typically by the browser — though Elmish can be used on other platforms as well.
Let’s take a look at each of these by implementing them for our application.
State
Below the ReminderList type, add the following:
type State =
  { Lists : ReminderList list
    SelectedList : ReminderList option }
Our sidebar represents a list of lists, so our model reflects this with an F# list of ReminderLists.
The main content area represents the currently selected list, if there is one. Our model reflects this using the F# option type. Option represents the presence or absence of a value. In our case, there may not be a list selected because we’ve only just loaded the page, or we might not have any lists at all.
Message
Below the State type, add the following:
type Msg = exnThis is our entire Msg type (for now).
What is exn? It’s a typealias for the .NET System.Exception class. What we’re doing here is typealiasing a typealias. Why?
It mostly has to do with how I like to develop front-end applications, which is as follows:
- Develop the UI
- Develop interactivity
I plan to follow this approach, but in order to bootstrap an application with Elmish, we need all five pieces in place. Typealiasing exn like this is similar to throwing a NotImplementedException in C#. It’s a great placeholder to keep the compiler happy while we’re still developing a section of code.
We’ll come back to the Msg type when we start implementing interactivity.
Initial state function
Below the Msg type, add the following:
let init () =
  { Lists = [
    { Id = 1
      Name = "Reminders"
      Color = "#F19A38"
      Reminders = [
        { Id = 1
          Task = "Do the dishes"
          IsCompleted = false };
        { Id = 2
          Task = "Hang up the clothes"
          IsCompleted = true }
      ]};
    { Id = 2
      Name = "Final project tasks"
      Color = "#3B82F7"
      Reminders = [
        { Id = 1
          Task = "Write an F# app"
          IsCompleted = false }
      ]}
    ]
    SelectedList = None }
This is the first function of our application. The init function takes unit and returns a State record, which is exactly what Elmish requires. We are providing test data and setting our initially selected list to the None case of the Option type. This test data will be helpful for developing our UI.
Notice that we haven’t specified any types, yet if you hover over init, you’ll see that it is still completely strongly typed:
val init:
      unit
   -> State
This is F#‘s powerful type inference system at work. We have no need to clutter our code with type annotations when F# can figure it out for us. In the case of init, F# sees we are constructing a record with the properties of the State type, so it infers the function to have a return type of State.
This is one of the benefits of type inference. We get the cleanliness and readability of a dynamically typed language, with the strong, compile-time guarantees of a statically typed language.
Update function
Below the init function, add the following:
let update msg state = stateThe update function takes a message and the current state and returns the next state. Again, we’re leveraging type inference to allow the F# compiler to determine the types. In this case, however, if you hover over update, you’ll see something interesting:
val update:
   msg  : 'a ->
   state: 'b
       -> 'b
What types are 'a and 'b? The ‘'’ character is F#‘s way of indicating a generic type parameter. The update function is completely generic: it takes some type 'a, and some type 'b — both of which need not be the same type, though they can be — and returns some type 'b. F# infers this function to be completely generic because we haven’t given the compiler much information — we haven’t used the function yet. Once we bootstrap our application and use this function, the compiler will infer more specific types.
Render function
Below the update function, add the following:
let render state dispatch = Html.h1 [
  prop.className [ "text-white" ]
  prop.text "Hello, FableReminders"
]
We also now need to add an open statement. Below the App module declaration, add the following:
open FelizThe render function takes the state and a dispatch function as input and returns a representation of a view. The dispatch parameter makes render a higher-order function (HOF). A higher-order function is one that takes a function as input or returns a function as output. If you hover over render, you’ll see:
val render:
   state   : 'a ->
   dispatch: 'b
          -> ReactElement
Breaking it down:
- As with the
updatefunction, F# has inferred therenderfunction to be almost entirely generic, except for in its return type. This will change when we call this function. - Our render function calls the
h1function, which is a static member function defined on a type calledHtmlfrom the Feliz module. Per the documentation, theh1function, along with all these domain-specific language functions, “can take simple values as their only input such a string, a number, a single child element or a list of child elements” and return aReactElement - We want to provide some classes to make the text stand out on the black background, so we pass in a list of properties. To define properties, we call static member functions on the
proptype provided by Feliz. For defining classes, we use theprop.classnamefunction passing a list of strings. Here, we use the Tailwind class"text-white" - Finally, since we are using the “list of properties” version of the
h1function, we need to set the text property of the element by using theprop.textfunction, passing a nice greeting.
Bringing it all together
Now, all that’s left to do is to put all of these pieces together. Open Program.fs and replace its contents with the following:
module Program

open Elmish
open Elmish.React

Program.mkSimple App.init App.update App.render
|> Program.withReactSynchronous "app"
|> Program.run
Let’s break this down:
- We define a new module and open the modules we need.
- We call the
Program.mkSimplefunction from theElmishmodule. This function sets up a so-called “simple” Elmish application using the 3 functions we defined earlier. A “simple” application is one where new state only comes from theinitandupdatefunctions, and the only side-effect is rendering using ourrenderfunction. - We call
Program.withReactSynchronousfrom theElmish.Reactmodule. This function call configures the mount point of the application within the DOM. In our case, this is an element with the"app"class. - We call
Program.runfrom theElmishmodule. This, unsurprisingly, runs our application.
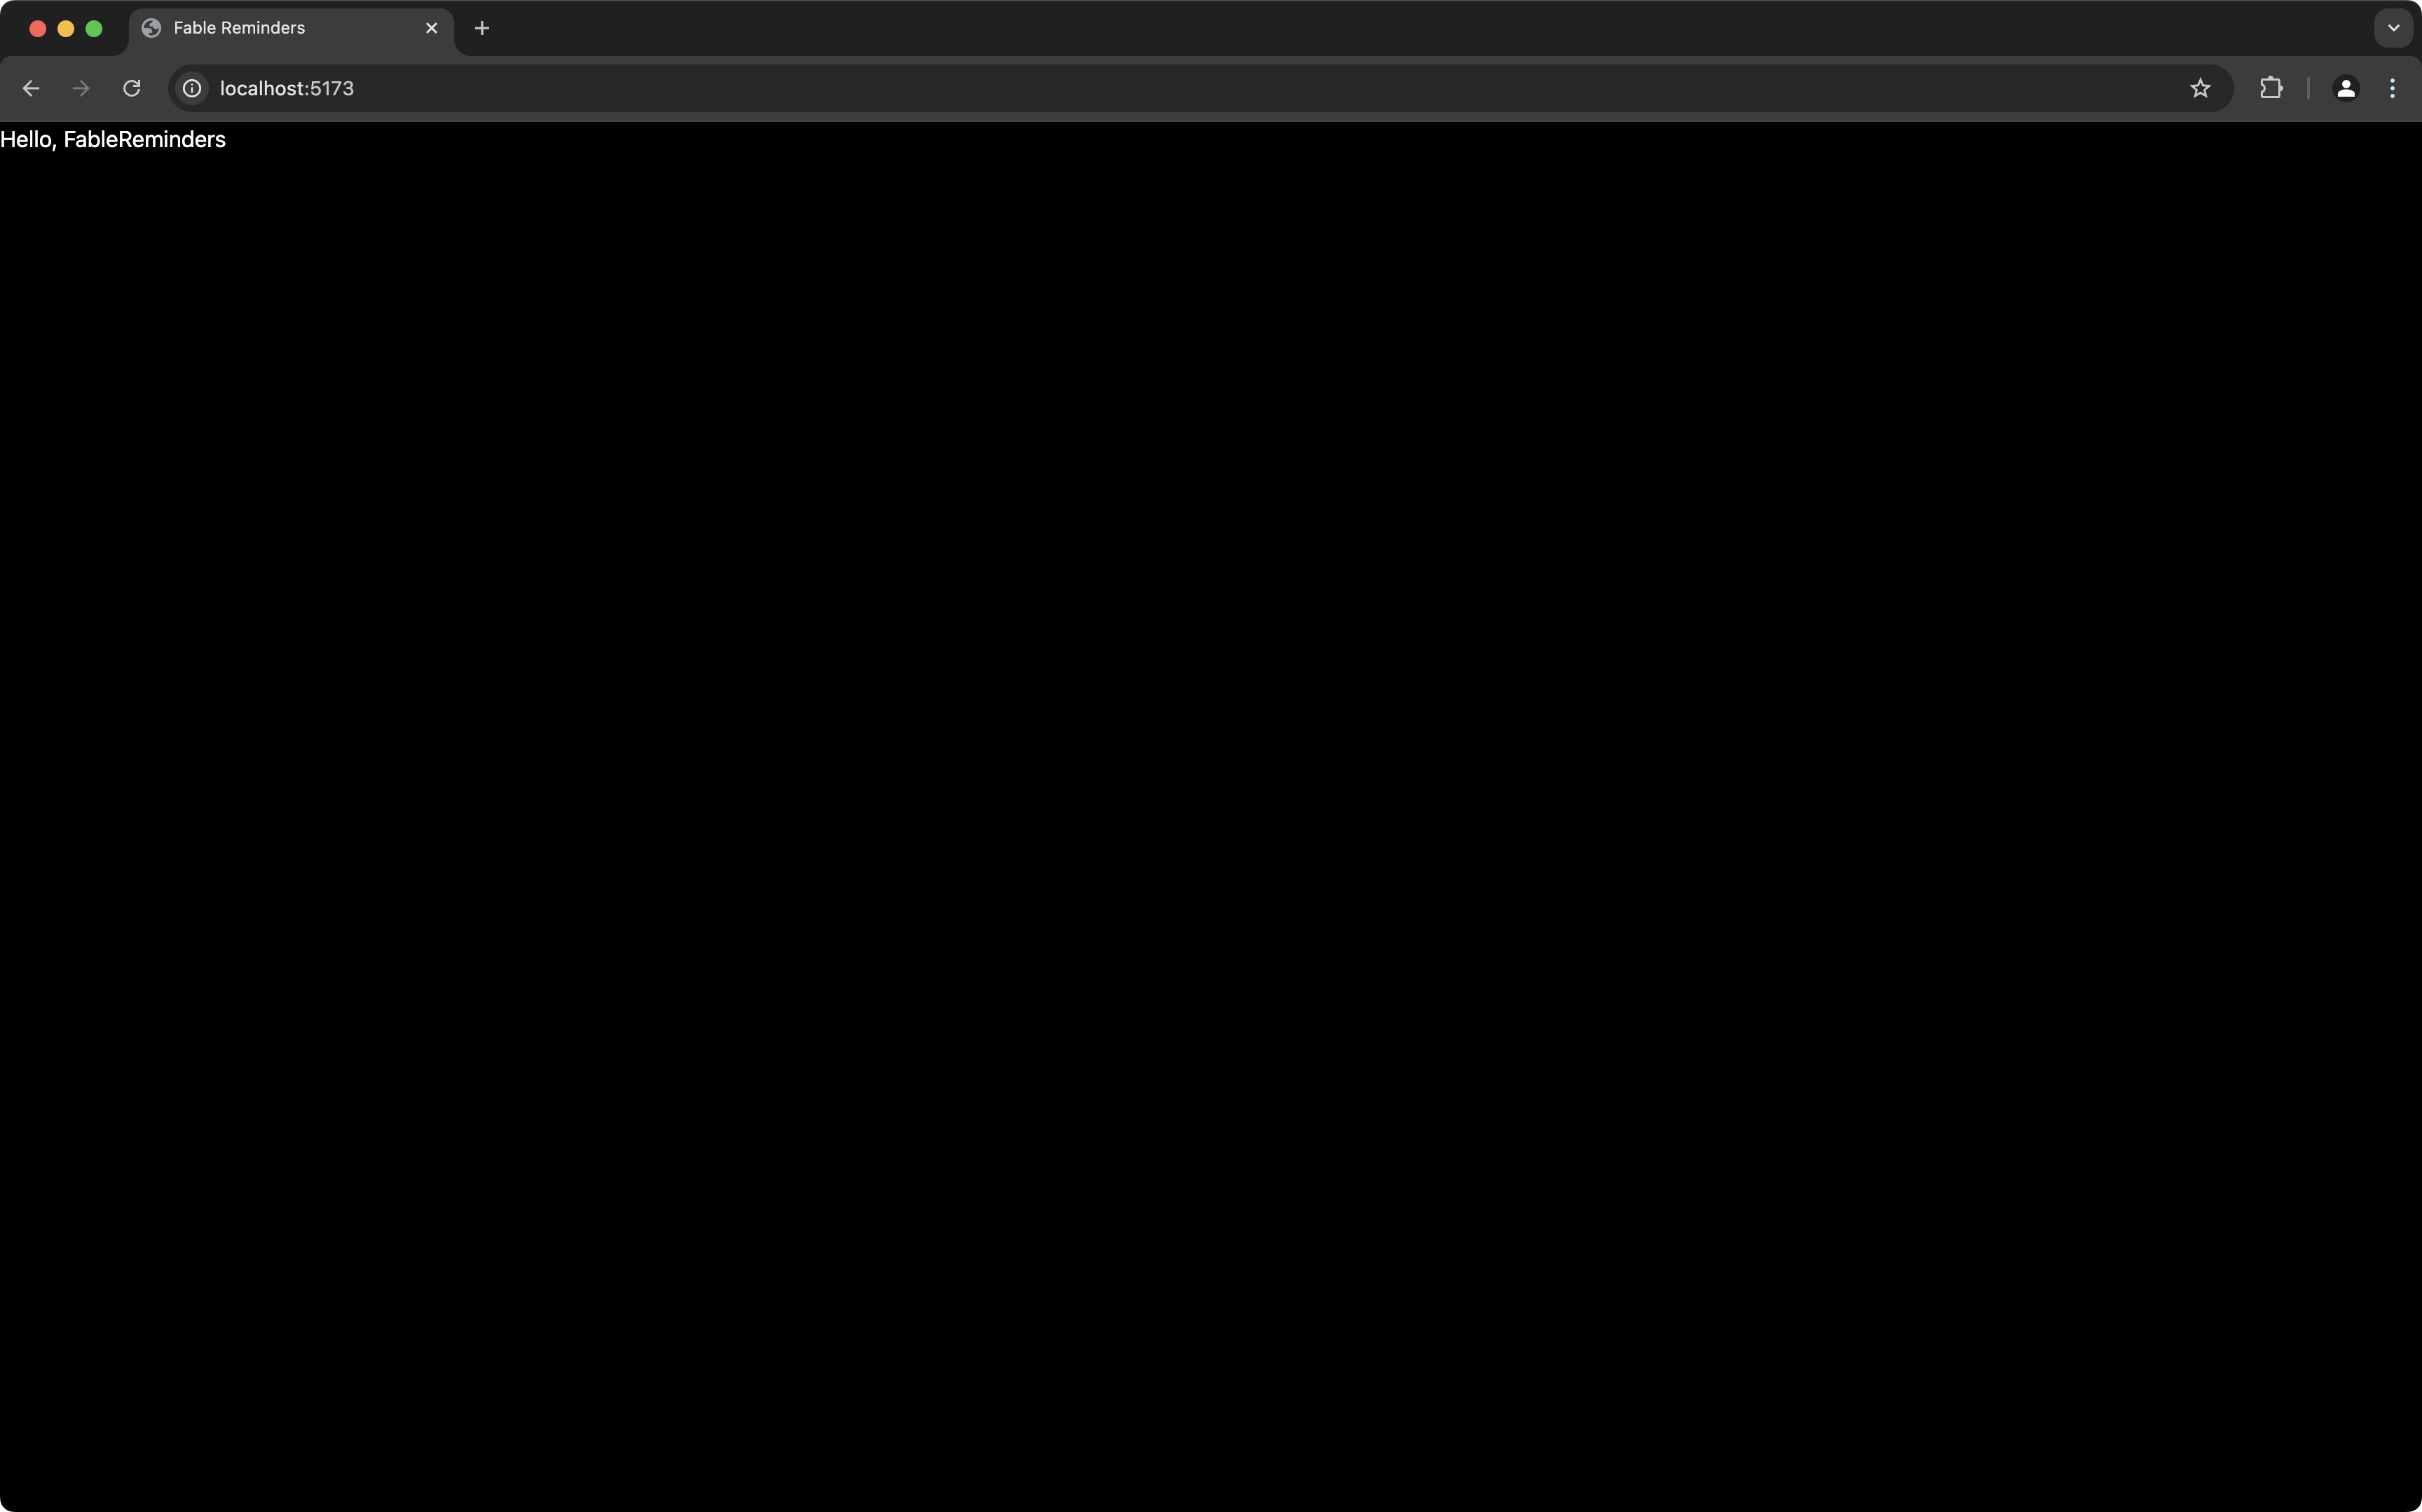
And that’s it! If we fire up our application by running npm run dev, we should see:
Preparing our layout
Before we wrap up, we’re going to update our render function to scaffold the basic layout of our application so that we are ready to hit the ground running for the next post. In App.fs, replace the render function’s implementation with the following:
let render state dispatch =
Html.div [
prop.className [ "container"; "mx-auto"; "flex"; "flex-row"; "bg-zinc-900"; "overflow-clip"; "h-screen"; "max-w-5xl"; "rounded-xl"; "lg:my-8" ]
prop.children [
Html.aside [
prop.className [ "h-full"; "w-1/3"; "min-w-fit"; "bg-zinc-800"; "border-r"; "border-black"; "p-4" ]
prop.children [
Html.p [
prop.className [ "text-white" ]
prop.text "[Insert sidebar content here]"
]
]
]
Html.section [
prop.className [ "h-full"; "grow" ]
prop.children [
Html.p [
prop.className [ "text-white" ]
prop.text "[Insert selected list content here]"
]
]
]
]
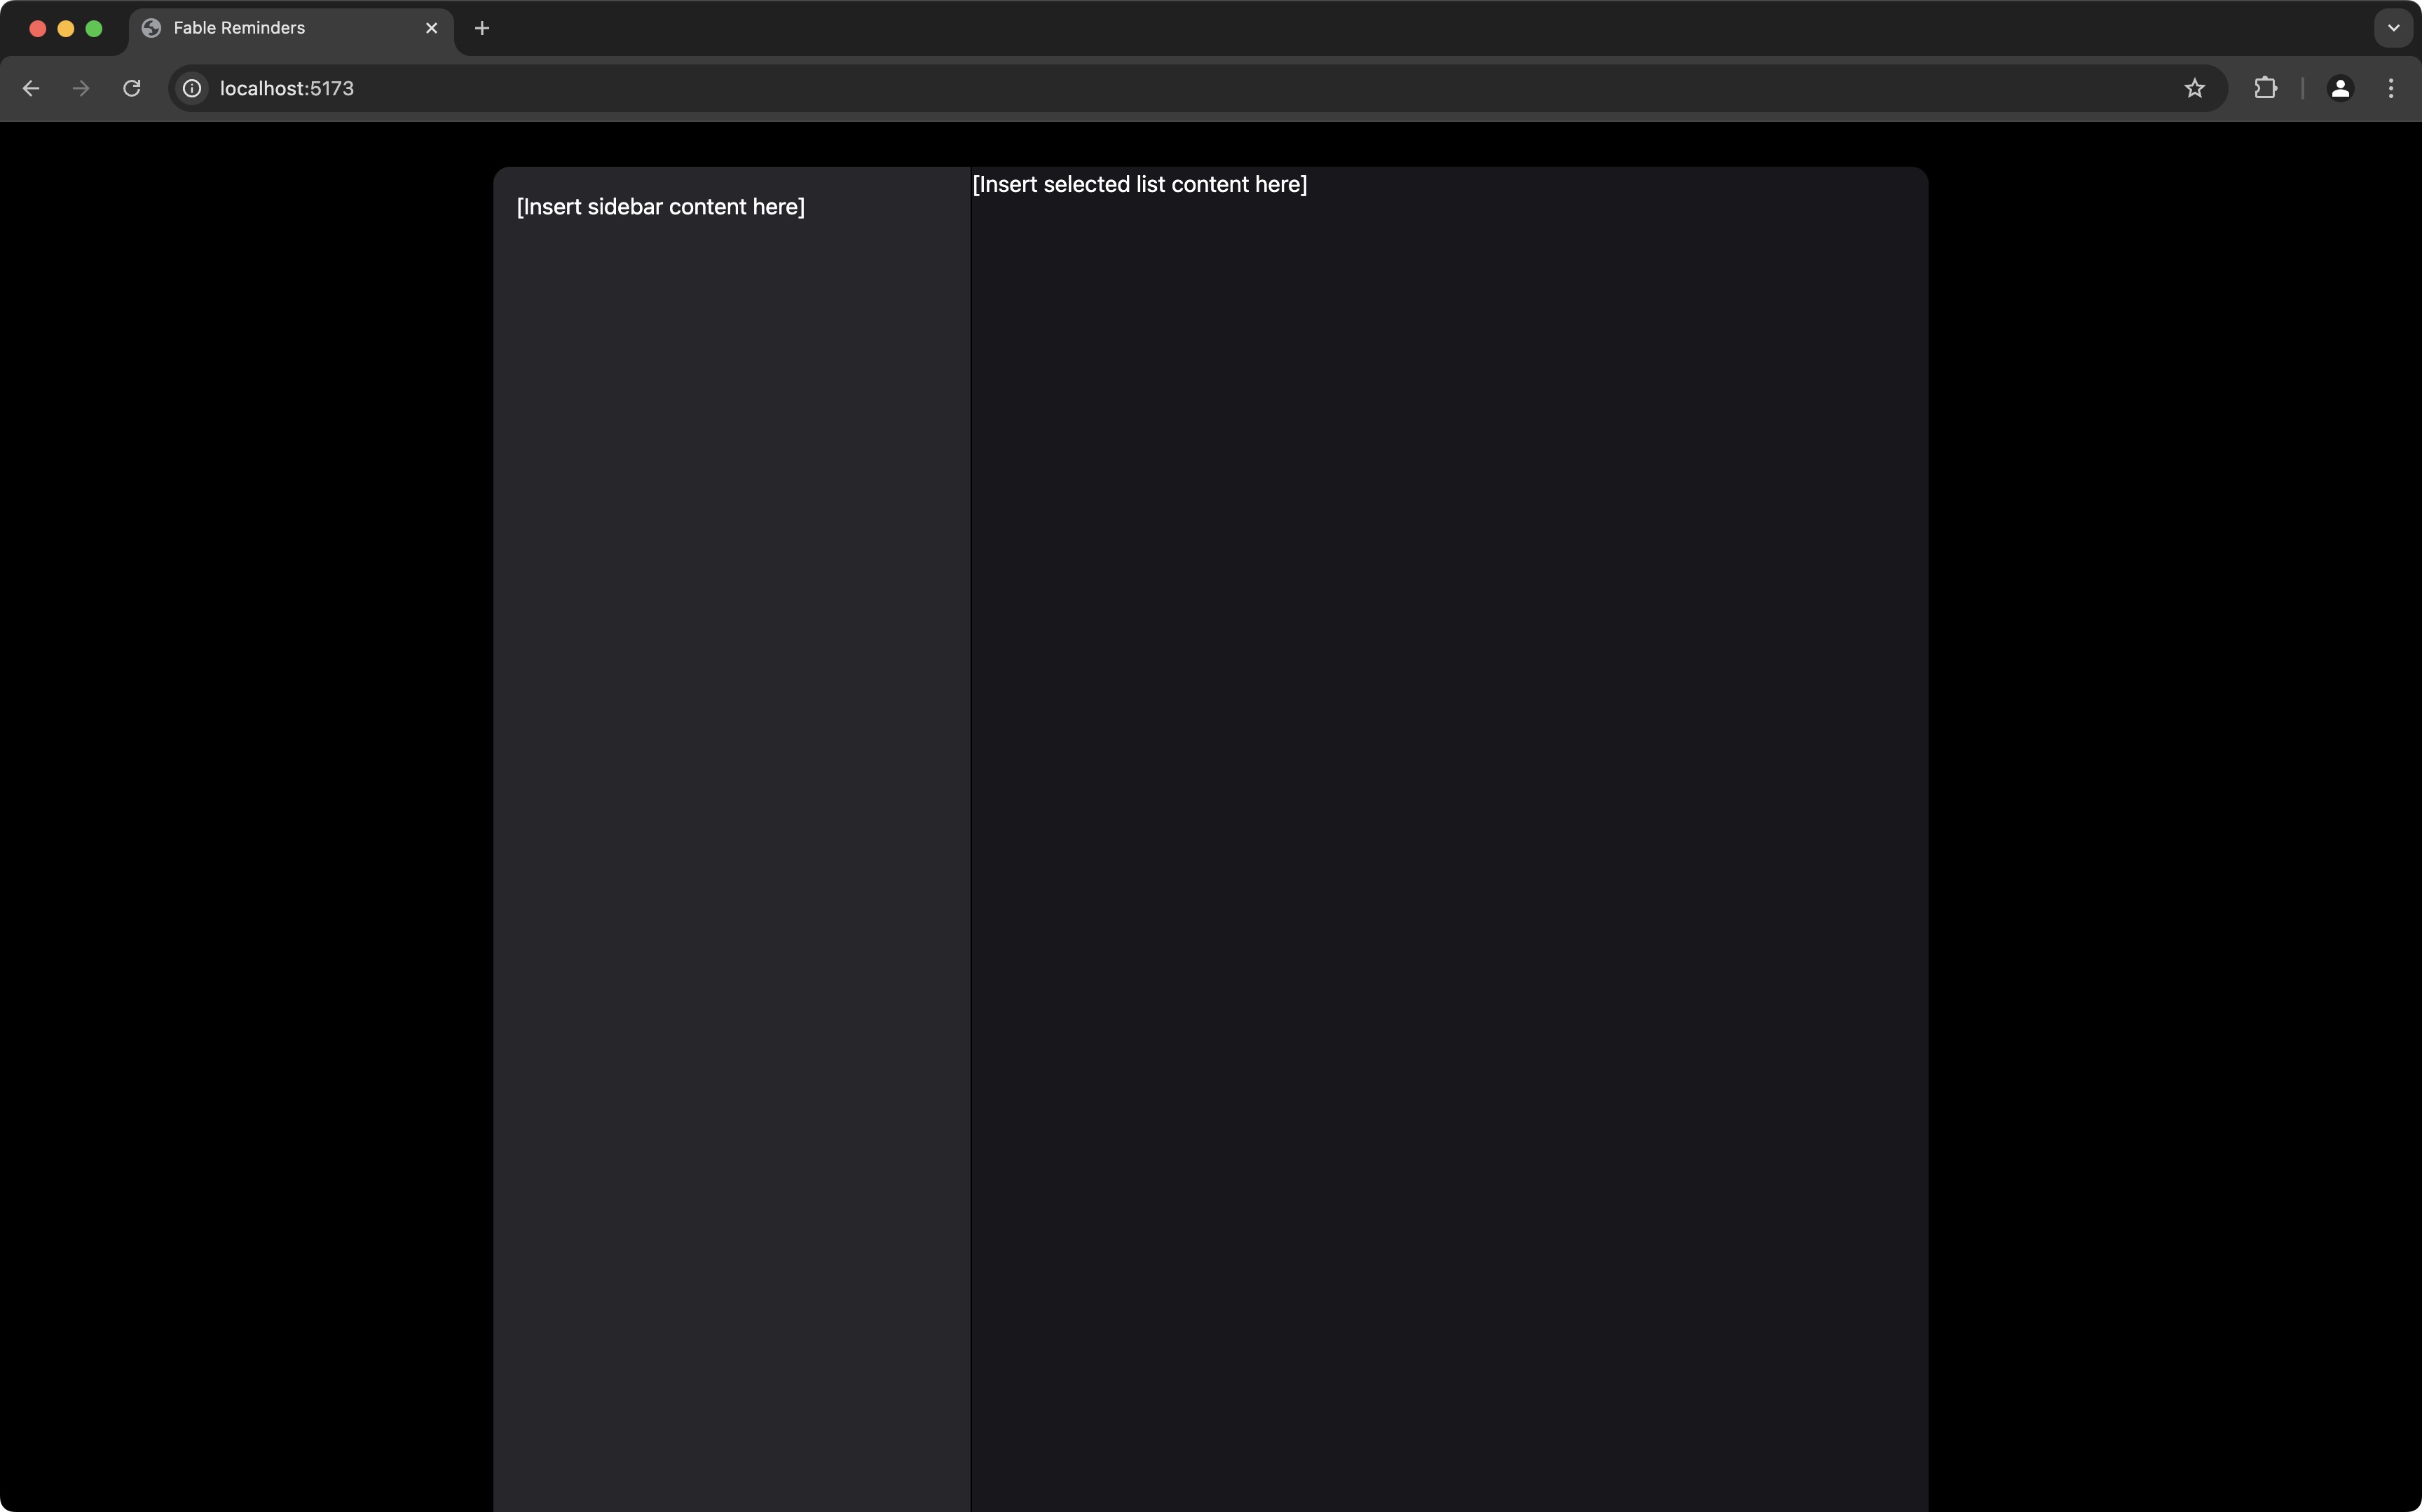
]With that, we should now have this:
Conclusion
I hope you are starting to get a taste for how web development works in F# — and how fun it can be! In part 3, we’re off to the races. We’ll implement the sidebar for our application and in so doing, we’ll see what building entire UIs in F# looks like! We’ll see some cool F# language features in action and we’ll learn about an important concept in functional programming: functors! In the meantime, you can find the completed code for this post here.
Happy coding!